Your First Rest Project
Introduction
In the first part of the Blog tutorial, you will learn:
- How to create a EOModel for the database (we will use H2)
- How to use migrations to create the database tables
- How to use ERRest to create blog posts with JSON format and how to display the blog posts in HTML for readers
Create a new project
You will need to create a new project for this tutorial. In Eclipse, open the File menu, select New and select Wonder REST Application (or ERRest Application, according to your WOLips version). Name your project as BlogRest.
Create the database model
Database structure
We will build a small database model for the blog. The database will have two tables: BlogEntry and Author.
BlogEntry will have the following columns:
Column name | Type | Constraints |
|---|---|---|
id | integer | primary key |
title | string(255) |
|
content | string(4000) |
|
creationDate | timestamp |
|
lastModified | timestamp |
|
author | integer | relation with Author |
Author will have the following columns:
Column name | Type | Constraints |
|---|---|---|
id | integer | primary key |
firstName | string(50) |
|
lastName | string(50) |
|
string(100) | unique |
Creating the EOModel
To create the database, we will first create a EOModel and use migrations to build the database on the file system (H2 will take care of creating the database file).
An EOModel consists of entities, attributes and relationships. When using it in a RDBMS context, an entity is a table (or a view), an attribute is a table column and a relationship is a join between two tables.
To create the EOModel, in the project right-click on the project name and select New -> EOModel.
Name it BlogModel and in the plugin list, select H2. Click Finish.
The model should show up in a window that looks like this:

If it didn't show up, the window might have opened behind the main Eclipse window. If that's the case, open the Window menu and select the windows that have Entity Modeler in its name.
In the Entity Modeler window, click on Default, and for the URL field, type
. When the database will be created, it will be stored in your home directory (/Users/youruser/ on OS X).
You can also specify an absolute path where to store in you h2 database files. For example on Windows OS URL field can be like this:
Notice, in the path, *nix like file separator "/" instead of Windows like "\" (as you can read here).
Now, right-click on BlogModel and select New Entity.
Type the following details in the Basic tab:
- Name: BlogEntry
- Table Name: BlogEntry
- Class Name: your.app.model.BlogEntry
Now, it's time to add the entity's attributes (aka, the table's columns). You will see that the entity already have an attributed named "id". That attribute is a integer for the primary key. Leave it there.
Let's create the first attribute: the title of the blog entry. Right-click on the entity and select New Attribute. Type the following values:
- Name: title
- Column: title
- Prototype: varchar255
When you use prototypes, you don't need to define the type (varchar, int, etc.) for the database, so by using prototypes, if you switch from a RDBMS system to another one, say from H2 to MySQL, you only need to change the JDBC connection string and bundle the EOF plugin for the RDBMS, no need to switch data types in the model.
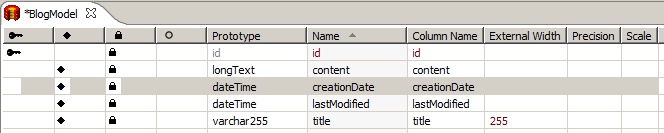
Now, repeat the last two steps to create the other attributes for the BlogEntry entity, with the following values:
Attribute name | Column | Prototype |
|---|---|---|
content | content | longtext |
creationDate | creationDate | dateTime |
lastModified | lastModified | dateTime |
If you did everything well, the list of attributes should look like this:
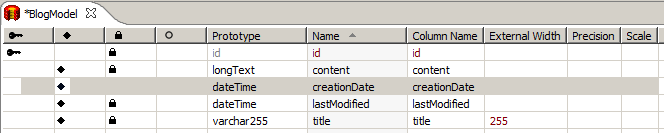
You will notice that the attributes have a column with a lock in it. When a lock is present, it will use the value of that attribute for UPDATE ... WHERE attribute = '' statement. This is to do optimistic locking, aka to prevent data conflict when the data object was modified by two different users. Using timestamps for optimistic locking is not a good idea because for certain RDBMS, the value can be different because of milliseconds, so remove the locks on the creationDate attribute. The final list should look like this:
Next step is to create the Author entity. Create a new entity with Author at its name (and also as the table name), and for the class name, use your.app.model.Author. The attributes for this entity are:
Attribute name | Column | Prototype |
|---|---|---|
firstName | firstName | varchar50 |
lastName | lastName | varchar50 |
varchar100 |
Final list of attributes should look like this:

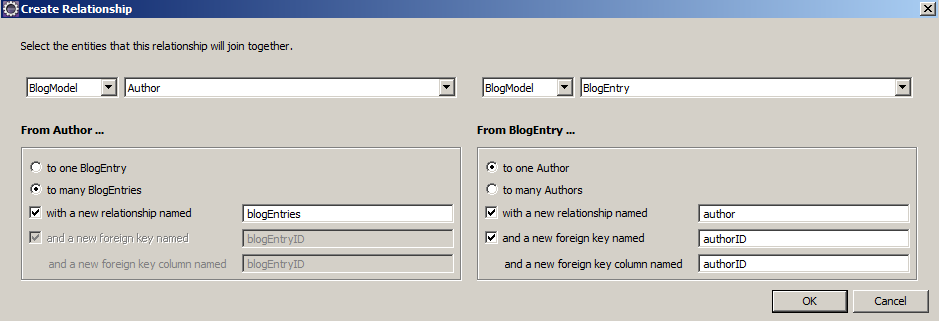
Now, it's time to link the two entities together. An Author can have multiple blog entries, and a BlogEntry can only have one author. To create the relationship (the join), right-click on Author and select New Relationship. On your right, select BlogEntry in the list. On your left, select to many BlogEntries, and on your right, select to one Author. Now, in BlogEntry, we need to store the primary key of the author so that we can make the join. The relationship builder allow us to add that attribute, so make sure and a new foreign key named is checked (it is checked by default). The Create Relationship pane should look like this:
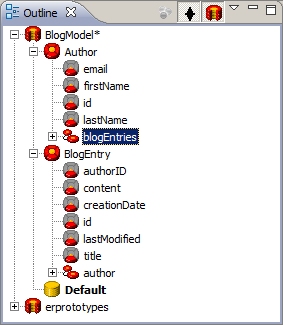
If you check in the Outline tab, you should see that Author now have a blogEntries relationship, and BlogEntry have a author relationship.
You are now ready to save the model. Save it (File -> Save) and close the Entity Modeler window. If you open the Sources in the main Eclipse window, you will notice that the Sources folder contains a package named your.app.model. (If this folder doesn't appear, you may need to set your preferences to automatically generate these source files; see the second suggestion on http://wiki.wocommunity.org/display/documentation/Useful+Eclipse+or+WOLips+Preferences.)
That package have four Java classes: _Author, Author, _BlogEntry and BlogEntry. Those classes were generated by Veogen, a templating engine build on Velocity. The two classes that starts with a underscore are recreated every time you change the EOModel, so if you want to change something in those classes, you need to change the template (no need for that right now). But you can change freely the two classes that don't have the underscore, and this is what we will be doing.
What we are going to do is to write a simple method that returns the full name of an author, e.g. a method that simply concatenate the first name, a space and the last name of the author. To do so, double-click on Author.java and add the following methods:
return this.firstName() + " " + this.lastName();
}
Nothing fancy here. Now open BlogEntry.java and add the following method:
public void awakeFromInsertion(EOEditingContext editingContext) {
super.awakeFromInsertion(editingContext);
NSTimestamp now = new NSTimestamp();
setCreationDate(now);
setLastModified(now);
}
Why are we adding this? awakeFromInsertion is a very good way of setting default values when creating a new instance of a Enterprise Object (EO). In this case, we want to set automatically the creation and last modification dates without having the user to add those values.
Now, let's use migrations to actually create the database.
Using migrations
Migrations allow you to create the tables and columns (and some types of constraint). Entity Modeler has support to generate the code for the first migration, which is called "migration 0". To do that, open the EOModel (BlogModel EOModel in the Resources folder), right-click on the model name and select Generate Migration.
Copy the generated code in the clipboard. Close Entity Modeler and in the main Eclipse window, right-click on Sources, select New and select Class.
Type your.app.model.migrations as the package and BlogModel0 as the name of the class. Click Finish.
In the Sources folder, open the your.app.model.migrations package, a class named BlogModel0 should be there. Delete everything in that file EXCEPT the first line (which should be package your.app.model.migrations) and paste the code that was generated by Entity Modeler. Save the file.
One last step: migrations are disabled by default. To enable them, you need to uncomment two properties in the Properties file that is located in the Resources folder. Open that file (double-click on it).
Remove the pound char in front of those two properties:
#er.migration.createTablesIfNecessary=true
After removing the pound char, the two properties should look like this:
er.migration.createTablesIfNecessary=true
You are now ready to start the application so that it creates the database! To do so, right-click on Application.java (in the your.app folder) and select Run As -> WOApplication. In Eclipse's Console tab, you should see some output, including something similar to:
BlogRest[62990] INFO er.extensions.jdbc.ERXJDBCUtilities - Executing CREATE TABLE Author(email VARCHAR(100) NOT NULL, firstName VARCHAR(50) NOT NULL, id INTEGER NOT NULL, lastName VARCHAR(50) NOT NULL)
BlogRest[62990] INFO er.extensions.jdbc.ERXJDBCUtilities - Executing ALTER TABLE Author ADD PRIMARY KEY (id)
BlogRest[62990] INFO er.extensions.jdbc.ERXJDBCUtilities - Executing CREATE TABLE BlogEntry(authorID INTEGER NOT NULL, content TIMESTAMP NOT NULL, creationDate TIMESTAMP NOT NULL, id INTEGER NOT NULL, title VARCHAR(255) NOT NULL)
BlogRest[62990] INFO er.extensions.jdbc.ERXJDBCUtilities - Executing ALTER TABLE BlogEntry ADD PRIMARY KEY (id)
BlogRest[62990] INFO er.extensions.jdbc.ERXJDBCUtilities - Executing ALTER TABLE BlogEntry ADD CONSTRAINT "FOREIGN_KEY_BLOGENTRY_AUTHORID_AUTHOR_ID" FOREIGN KEY (authorID) REFERENCES Author (id)
BlogRest[62990] DEBUG NSLog - evaluateExpression: <er.h2.jdbcadaptor.ERH2PlugIn$H2Expression: "UPDATE _dbupdater SET version = ? WHERE modelname = ?" withBindings: 1:0(version), 2:"BlogModel"(modelName)>
If you see this and that the application is running (it should open a window in your favorite browser), migration worked and your database have been created, congratulations! You can now stop the application (click the square red button in Eclipse's Console tab) and continue to the next step.
Creating REST controllers and routes
Project Wonder contains a framework called ERRest, which follow the same patterns as Ruby on Rails REST concepts. Using REST-style URLs is perfect for building a public blog and to create REST services to manage posting over HTTP with JSON, XML or other formats.
By default, a REST route in ERRest will generate a link like this:
So for our case, to get the first blog posting from BlogRest, the URL will look like this:
Creating controllers
ERRest needs controllers to act as a broker between working with the objects and the routes. So let's create a controller for BlogEntry.
Create a Java class named BlogEntryController, in the your.app.rest.controllers package, that will extend from er.rest.routes.ERXDefaultRouteController. Click Finish.
When you extend from ERXDefaultRouteController, a bunch of methods are added to the subclass. Let's see what they are for.
- updateAction: to update a specific instance of BlogEntry
- destroyAction: to delete a specific instance of BlogEntry
- showAction: to get one specific instance of BlogEntry
- createAction: to create a new object (a new instance of BlogEntry)
- indexAction: to list all (or a sublist) of the objects.
For this tutorial, we will implement the createAction and indexAction methods. But first, we need to create a key filter. A key filter will... filter the input and the output of REST request so that you don't have to send all attributes for a blog entry. For example, we want to show the details for an author, but we don't want to show the password for the author (in real-life, the password would be encrypted)!
Add this method in BlogEntryController:
ERXKeyFilter personFilter = ERXKeyFilter.filterWithAttributes();
personFilter.setAnonymousUpdateEnabled(true);
ERXKeyFilter filter = ERXKeyFilter.filterWithAttributes();
filter.include(BlogEntry.AUTHOR, personFilter);
filter.setUnknownKeyIgnored(true);
return filter;
}
Now, let's implement the createAction method:
BlogEntry entry = create(filter());
editingContext().saveChanges();
return response(entry, filter());
}
In 3 lines of code, you can create an object based on the request, save the new object to the database and return the new object in the response. Not bad, eh?
Last step in the controller: implementing the indexAction method. Again, the code is simple:
NSArray<BlogEntry> entries = BlogEntry.fetchAllBlogEntries(editingContext());
return response(entries, filter());
}
That code simply fetch all blog entries and return them in the response.
We can now go to the next step: adding the routes.
Adding the routes
A route in ERRest is simply a way to define the URL for the entities and to specify which controller the route should use. When your controller extends from ERXDefaultRouteController, it's easy to register a controller and a route. In Application.java, in the Application constructor, add the following code:
restRequestHandler.addDefaultRoutes(BlogEntry.ENTITY_NAME);
ERXRouteRequestHandler.register(restRequestHandler);
setDefaultRequestHandler(restRequestHandler);
The addDefaultRoutes method do all of the required magic, and use convention. That's why we had to name the controller BlogEntryController, because the convention is <EntityName>Controller.
We are now reading to add and list blog postings! Start the application and take notice of the URL. It should be something like _http://yourip:someport/cgi-bin/WebObjects/BlogRest.woa_
Adding posts and authors with curl
Since we didn't implement any HTML for our REST routes, we will create blog entries with curl, an open source HTTP client that is bundled with Mac OS X (you can use another client, like wget, if you like too). So let's create a blog entry.
To create a blog entry, you need to use the POST HTTP method. We will use JSON as the format since it's a bit less chatty than XML. So if the URL to the application is http://192.168.0.102:52406/cgi-bin/WebObjects/BlogRest.woa_, the full _curl command will be:
The response should look this:
Content-Length: 249
x-webobjects-loadaverage: 0
Content-Type: application/json
{"id":1,"type":"BlogEntry","content":"Some text","creationDate":"2011-12-27T21:59:08Z","title":"First post","author":{"id":1,"type":"Author","email":"probert@macti.ca","firstName":"Pascal","lastName":"Robert"}}
To get a list of blog entries:
You can stop the application and proceed to the next step.
Adding HTML views for blog posts
Now, let's build a HTML view for blog posts (you don't want your readers to get your posts by JSON, right?). Again, we will use convention to make it work easily. Open up BlogEntryController and add the following method:
protected boolean isAutomaticHtmlRoutingEnabled() {
return true;
}
Switching the return value of this method says that we will follow a certain convention for HTML components. The convention for automatic HTML routing is that the component should be named <EntityName><Action>Page.wo. So in our case, the component will be BlogEntryIndexPage. Right-click on the project name in Eclipse and select New -> WOComponent. Change the name to BlogEntryIndexPage and check the Create HTML contents button. Click Finish.
The next step to get it to work is to make BlogEntryIndexPage to implement the er.rest.routes.IERXRouteComponent interface.
public class BlogEntryIndexPage extends WOComponent implements IERXRouteComponent {
So now, the automatic HTML routing will send the request for ra/blogEntries.html to the BlogEntryIndexPage component. But we don't have any content in this component, so let's make a method to fetch all blog entries per creation date in descending order. So in BlogEntryIndexPage.java, add the following method:
EOEditingContext ec = ERXEC.newEditingContext();
return BlogEntry.fetchAllBlogEntries(ec, BlogEntry.CREATION_DATE.descs());
}
We need to use that method in a WORepetition, and for that loop, we need a BlogEntry variable to iterate in the list, so add the following code to BlogEntryIndexPage.java:
public BlogEntry entryItem() {
return entryItem;
}
public void setEntryItem(BlogEntry entryItem) {
this.entryItem = entryItem;
}
The Java part is done, so let's add the loop inside the component. Open BlogEntryIndexPage.wo (it's located in the Component folder) and right after the <body> tag, add:
<p><wo:str value="$entryItem.title" /></p>
<p><wo:str value="$entryItem.author.fullName" /></p>
</wo:loop>
That component code will loop over the blog entries and display the title of the entry + the name of the author. Save everything and run the application.
If you go to http://192.168.0.102:52406/cgi-bin/WebObjects/BlogRest.woa/ra/blogEntries.html, you will see the list of blog entries!
Now that we have a list of blog entries, let's make a page to show the content of a blog entry. Create a new component named BlogEntryShowPage.
Open BlogEntryShowPage.java and make sure the class implements er.rest.routes.IERXRouteComponent.
public class BlogEntryShowPage extends WOComponent implements IERXRouteComponent {
We need to add other methods to receive the BlogEntry object from the controller. In BlogEntryShowPage.java, add:
@ERXRouteParameter
public void setBlogEntry(BlogEntry blogEntryFromController) {
this.blogEntry = blogEntryFromController;
}
public BlogEntry blogEntry() {
return this.blogEntry;
}
The @ERXRouteParameter annotation tells the REST framework that it can automatically receive an object from the controller. And again, it's convention at work. You have to use the annotation and the setter name should be set<EntityName>, so for a BlogEntry, it's setBlogEntry, for a Author, it will be setAuthor.
The Java part of the work is done, so save the Java class. It's time to work on the component part. Open BlogEntryShowPage.wo and between the <body></body> part, add:
<p><wo:str value="$blogEntry.content" /></p>
<p>Created on: <wo:str value="$blogEntry.creationDate" dateformat="%Y/%m/%d" /></p>
<p>Added by: <wo:str value="$blogEntry.author.fullName" /></p>
Our view component is done, the only thing remaining is a link for the blog entry list (BlogEntryIndexPage) to the view page (BlogEntryShowPage). Save BlogEntryShowPage.wo and open BlogEntryIndexPage.wo. We are going to add a link on the title, you will replace to replace this:
with:
Save the component and run the app. Go to http://192.168.0.102:52406/cgi-bin/WebObjects/BlogRest.woa/ra/blogEntries.html to get the list of posts, and you should see a link on the title. Click on it, and now you get the full details of the blog entry!
The REST part of this tutorial is now complete, you can now move to the next part of the tutorial.