D2W Flow Control
Related articles
What is Direct to Web?
The D2W Rule System
D2W Flow Control
Setting up a D2W app is almost too easy. You only need to build a data model and you get an instant application. You don't have to spend any time thinking about creating lots of page components, setting up proper input validation in your view, making sure everything is localizable, ... you get all that for free. A lot of really tedious work is simply done already. It is very liberating.
Once you are unshackled by D2W, you immediately want to modify it to fit your needs. To customize the structure of your app and the components used, you only need to learn your way around the rule system. With the rule system, you can switch out practically anything with a few rule changes. Understanding the rule system and the D2WContext leads you to creating custom components to handle tasks and object properties in new ways.
It is here where you must be very careful. Good D2W components are object neutral. They don't care what EO you stick in them, they just work. If you don't understand D2W flow control, you might end up coding a lot of specialized components to do the job. If you find you are writing a component for a specific entity or set of entities and it won't work with just any entities, it's possible you may be sticking control code, model code, or both in your view layer. WebObjects is designed to have a clean separation between Model, View, and Controller: MVC. If you do mix control code in your View or Model layer, you will only waste a lot of your own time by making your app more difficult to maintain.
Learn to wield D2W.
If you are just starting out with D2W and you don't understand flow control, you may feel like you are stuck on rails. You go wherever the D2W train takes you. Understanding how flow control works in a D2W app is the key to taking the reigns and steering the application in any direction you would like to go. At the most basic level, D2W flow is very simple. D2W pages have a binding called nextPage and nextPageDelegate. These two simple bindings are the entry point to the controller code you use to direct the flow of a D2W app. What generally happens in well behaved D2W view components is that the nextPageDelegate is checked first. If the delegate exists, nextPage() is called on it. If the delegate does not exist, the component falls back to nextPage() on the D2WPage component. If you are not using Wonder, you can stop reading here. Sorry, that's all you get. The rest of this article will be discussing some of the custom flow control concepts found in Project Wonder's ERDirectToWeb framework.
ERDActionButton subclasses
The first group of flow control components I'd like to mention are simply button components that perform specific tasks. Edit, delete, inspect, select, ... these tasks, common to all enterprise objects, can be accomplished with a number of components that subclass ERDActionButton. You can drop one into your page using using the rule system. They are typically used in conjunction with the actions RHS key, but can potentially be used in displayPropertyKeys repetitions as well. By default they are loaded with ERDDefaultActionAssignment.
Control Delegates
ERDQueryDataSourceDelegateInterface
ERDQueryDataSourceDelegateInterface isn't a next page delegate. What it allows you to do is manipulate the datasource generated by an ERD2WQueryPage. If you need to apply custom control logic to the results generated by your query pages, this is the place to do it. For example, if you wanted to replace the default AND qualifier used by the query page with an OR qualifier, you could do something like this:
package com.example.delegates;
import com.webobjects.eoaccess.EODatabaseDataSource;
import com.webobjects.eocontrol.EODataSource;
import com.webobjects.eocontrol.EOFetchSpecification;
import com.webobjects.eocontrol.EOQualifier;
import com.webobjects.foundation.NSArray;
import er.directtoweb.delegates.ERDQueryDataSourceDelegateInterface;
import er.directtoweb.pages.ERD2WQueryPage;
public class MyQueryDataSourceDelegate implements ERDQueryDataSourceDelegateInterface {
public EODataSource queryDataSource(ERD2WQueryPage sender) {
EODataSource ds = sender.dataSource();
if (ds == null || !(ds instanceof EODatabaseDataSource)) {
ds = new EODatabaseDataSource(sender.session().defaultEditingContext(), sender.entity().name());
sender.setDataSource(ds);
}
EOFetchSpecification fs = ((EODatabaseDataSource) ds).fetchSpecification();
fs.setQualifier(qualifierFromSender(sender));
fs.setIsDeep(sender.isDeep());
fs.setUsesDistinct(sender.usesDistinct());
fs.setRefreshesRefetchedObjects(sender.refreshRefetchedObjects());
int limit = sender.fetchLimit();
if (limit != 0) {
fs.setFetchLimit(limit);
}
NSArray prefetchingRelationshipKeyPaths = sender.prefetchingRelationshipKeyPaths();
if (prefetchingRelationshipKeyPaths != null && prefetchingRelationshipKeyPaths.count() > 0) {
fs.setPrefetchingRelationshipKeyPaths(prefetchingRelationshipKeyPaths);
}
return ds;
}
private EOQualifier qualifierFromSender(ERD2WQueryPage sender) {
EOQualifier q = sender.qualifier();
// q = ... create your OR qualifier here
return q;
}
}
NextPageDelegate
ERDPageNameDelegate
The ERDPageNameDelegate is an extremely simple next page delegate, so I'll mention it briefly. To use it, just hand it a page name in its constructor and it will return that component by invoking pageWithName on the sender WOComponent. That's it. Hand it to a D2WPage's setNextPageDelegate method and you're done.
D2WPage page = ...;
ERDPageNameDelegate delegate = new ERDPageNameDelegate("SomePageName");
page. setNextPageDelegate(delegate);
ERDBranchDelegate & ERDControllerButton
There are several other NextPageDelegates in Wonder, but I'm only going to mention one more: My personal favorite. ERDBranchDelegate is an extremely useful next page delegate. It is also a fairly well documented delegate... if you know where to look It's located in the documentation for ERD2WPage's pageController() method (bit more here: Page Controller in ERD2W).
What this documentation is telling you is that in your 'WebSite' entity's list page, you will see an edit button and a cogwheel button in each row of your list table. The cogwheel button is the ERDControllerButton, a special subclass of ERDActionButton discussed earlier. It will produce a menu connected to your control methods. ERDBranchDelegate finds its control methods automatically via reflection. The control methods match a signature of
public WOComponent <method-name>(WOComponent sender) {
//control code goes here
}
The menu items, by default, will be named "Copy Web Site" and "Delete Web Site" and they will execute the control code found in copyWebSite(WOComponent sender) and deleteWebSite(WOComponent sender), respectively.
A picture is worth a thousand words though... This is a screenshot of the ERDControllerButton in use.
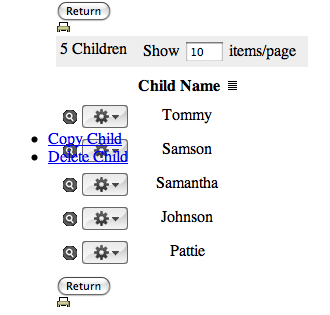
In this picture, the entity is named Child and I'm using an inspectAction instead of an editAction. Clearly, the css there needs a little work as well, but ... you get the idea.
If your application uses ERModernLook, the controllerButton is hidden in the style sheet. To display it you should add a stylesheet to your application using this method (point 4), in which you specify how you want to display your controller button. For exemple :
span.ERDControllerButton {
display: block;
}
Then there are three ways to display the ERDControllerButton. The first one is the default one, called "flyOver", which displays as a single button which contains your controller methods as links. The second one is "buttonList", and the third one is "linkList" (these are quite explicits).
You can switch between these configurations with the controllerButtonUIStyle rule. If you want the buttonList :
true100 : => controllerButtonUIStyle = "buttonList" [WO:Assignment]
What this documentation doesn't tell you is that the ERDBranchDelegate is even more powerful than that. For one, you can easily customize/localize those menu item strings. For instance, your Spanish Localizable.strings file might contain
"Button.copyWebSite" = "Copie el Web site";
"Button.deleteWebSite" = "Web site de la cancelación";
Also, you can use Java annotations to define which control methods are available based on scope, task, and pageConfiguration.
@D2WDelegate (
scope = "object", availableTasks = "inspect list", availablePages = "ListWebSite InspectWebSite"
)
public WOComponent copyWebSite(WOComponent sender) {
setSender(sender);
WOComponent result = null;
return result;
}
The values for scope can be either object or selection, availableTasks values are your d2wContext().task() keys, and availablePages values are equivalent to the page configuration names. What do these annotations mean? They define when the control method is available. For instance, in the above example, the "object" scope means the control method is only available at the object level. If you put it into a list page, then it will be available in the list repetition of objects, but not in a control button above or below the list. The other annotations further restrict the method to the specified tasks and page configurations.
Using this technique, you could conceivably define the branching control code for an entire application in a single file! As @anjo has pointed out on the list, using annotations means that you're compiling something that really belongs in the rule system. Of course, he's right... So how do you use the rule system to define your branch choices? That's easy enough. Just use a rule like
And you will get the exact same effect, but you'll get the full power and flexibility of the rule system instead. ERDBranchDelegate is an extremely clever solution
ERDActionBar
Finally, I'd like to mention the ERDActionBar. Much like the ERDControllerButton, ERDActionBar also makes use of the ERDBranchDelegateInterface to provide branching control. However, with this component, instead of providing a single menu style selection, you get a repetition of buttons. Another big difference is that ERDActionBar looks for a branch delegate on the nextPageDelegate instead of looking at the pageController RHS key.
Also worth mentioning, the ERDControllerButton uses the pageController from the innermost ERD2WPage with a pageController, whereas the ERDActionBar goes uses the outermost NextPageDelegate that is a branch delegate. Otherwise, the two components are pretty much the same. They fire methods and localize button names identically.
One tricky part to using an ERDActionBar is that the keys you use to insert one into a page are not very consistent. For instance, with the ERD2WListPageTemplate, it's embedded in the page. There's no way to turn it off besides having no branch delegate in your page's nextPageDelegate(). With ERDQueryPageTemplate, it's inserted with the 'actionBarComponentName' RHS key. With any of the ERNeutral components, you'll need to use 'belowDisplayPropertyKeys' or 'aboveDisplayPropertyKeys' in combination with a rule for an action propertyKey and a third rule for a component name for that action propertyKey. Similar key inconsistencies exists for the ERDControllerButton... So if you're having trouble figuring out how to insert one of these components, you might just want to dig around in the page components to look for the hooks.